ACTION
ANIMATIONS
...or, 'Hop,
Skip and Jump'
So, we have idle and we have weapons animations, now we need to cover more
complex issues like run, jump, walk, swim, etc...
The key thing to remember with action animations is to make them exaggerated and
over the top. It needs to be obvious even from a distance what that model
is doing in the game, which is the whole point of adding more detailed
animations to an FPS in the first place.
I am not going to cover all of the previously mentioned animations, because the
principle remains the same behind all of them. I will show you how to make
a simple walk cycle and that, combined with studying the relevant MAX files in
the SDK should give you enough know-how to make the other animations yourself.
Open your base biped file.
First things first. Set the length of the walk cycle to the relevant
length. A standard walk cycle is 24 frames (0-23).
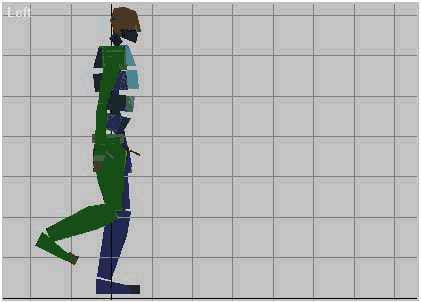
Now, consider the movement that your biped is making. At present he is
stood in a neutral fashion as if he's contemplating his impending fragging.
In reality if you walk continuously, you don't take two steps and return to a
neutral position before continuing, do you? My point is this: Your
skeleton needs to move into the walk cycle from the same position that he ends
it. So you'll need to position your skeleton as if it's just completing a
walk cycle:
Now set the keys for the start and finish frames.
During the course of the animation the biped walks forward a little over 56
units. So, select your Bip01 diamond and with the animation button activated and
the slider over to the right on the last frame, move the diamond forward 56
units. You can count the units in the XYZ position counter at the bottom of the
screen.

Now, if you play the animation your biped will mysteriously hover over to the
end position in the walk cycle. We need to make him use his legs in the
process of traversing that distance now. The walk cycle will be ideally
divided into 6 equal sections, with a set of keys at each section. I have
illustrated the six sections here.

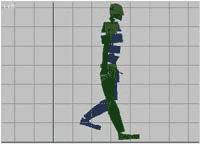
This may well get vague and confusing. I'll do my best to explain it carefully.
The six sections are ideally essential positions that we need the biped to be in
at those specific frames in the animation. During the course of the
animation the skeleton will take two steps and finally return to the position he
started off in but 100 units forward of his starting position. Studying a
walk cycle, I determined that dividing the cycle into six sections yielded these
positions as the most obvious.
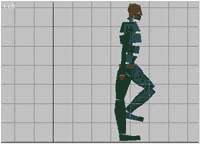
We have already positioned our skeleton in the pose of picture 1. That is
the start position, so, with the animation button activated, I move the slider
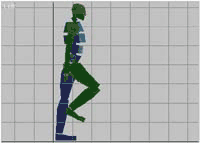
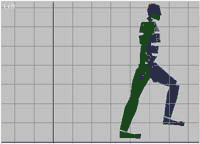
forward to frame 4 and position the biped skeleton as in picture 2:
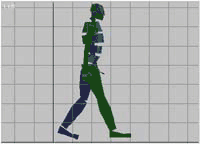
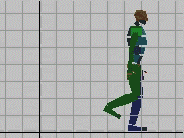
Then, I move the slider to frame 8 and I position the Biped as in image 3.
I keep repeating this until I reach frame 20. Now there are four frames left
which bring us neatly back to the original stance at frame 23.
Play the loop and, BEHOLD! He walks,
...sort of. It's more of a slip than a walk, but it's a good base to build
on. We are going to need to adjust the legs at certain points to make the
walk more convincing.
Things to consider as well, are that when someone walks, their whole body shifts
from one foot to the other. The whole body raises as the walker lifts
themselves up off their foot and sinks as it comes down on the other foot.
Also, as the walker shifts their weight on to one foot to raise the other, they
pretty much center their weight on that foot, this means that feet are centered
as they pass under the body's center of gravity. This is just a couple of
many, many things that you need to consider when animating, especially natural
movements, which tend to flow and ebb smoothly with all number of weird and
subtle quirks. Once again, as with modeling and skinning, STUDY!
Study movement, nature videos, watch people, study other animated models.
Again, as with the modeling and skinning tutorials, I'm reaching a point where
I'm going to have to leave you to experiment on your own. However before I go, I
have some hints tips tricks and also a little bit on editing and deleting keys:
Tutorial created by Scarecrow,
THANK YOU !!!
©
http://www.Planetfortress.com/TF2Models
TF2 is trademark of Valve
Software and of Sierra Online.
© 2000 TF2 MODELS - Hosted by Planetfortress
Web designer/Webmaster : IXNAY